

Ok so I know there are many forums showing how to do this but I’m finding some steps are not illustrated very well. This is the way I did it so Hopefully I don’t leave any steps out I am writing strictly from memory now. Please feel free to correct me or even add some steps in order to shortcut mine. I will also take lots of pics and hopefully capture all parts needed.
I would highly suggest reading over this many times before starting and making sure you have it planned out in your head before starting.
· The online manual I used for a reference for some of this info is:
http://media.honda.co.uk/car/owner/media/manuals/PreludeManual/index.html
These steps are for my 88Lude 2ws (B20A5)
Parts Needed
· Pedal Assembly w/clutch pedal
· Manual Transmission
· Manual Transmission Starter
· Flywheel W/8 Bolts
· Throw-out Bearing
· Clutch alignment tool (TAT-5319)
· Transmission Mount For Manual
· Clutch Pressure Regulator
· Clutch W/ 6 Bolts
· Clutch Cover
· Clutch Master Cylinder
· Clutch Slave Cylinder
· Shifter Assembly
· Shift Linkage W/ Trans Bracket
· ( Cont Auto Cru) MT
· Brake sensor on pedal W/plug
· Clutch sensor On Pedal W/plug
· Box of Sandwich Bags for All Bolts and Small Parts
& 2 ft of heater hose the orig hose is to short
Oh and you will need three M10 X 1.50P X 90mm bolts for the trans mount. and one about half in shorter.
Ok I think were ready to get started now:
1. Jack up the car and secure it on jack stands. Very important remember safety 1st. I knew a guy who died cuz the car fell on him.
2. Remove all the Trans Fluid and Radiator Fluid
3. Remove Battery & for comfort I also removed the tray 10mm
4. Remove Intake and any other things that will be in your way
5. I removed both axles 32mm Nut and both sides of your fender well suspension
6. Now I removed the axel haft shaft
7. I went back up top and removed all the wiring and fluid linkage attached to the Auto Transmission
8. Remove the Starter and starter wiring
9. Remove center beam 6 bolts
10. Remove all Transmission Bolts
11. Crawl back under and remove the rear engine mount bolts
12. Then remove the Flywheel cover
13. Unbolt the 10mm bolts behind the torque converter. The transmission will come off if you skip this step but I’m sure it will be allot easier if you do unbolt them first.
14. now I kind of cheated by just cutting the automatic shift linkage with my wheel grinder on the interior and under but, the way you should do it is unbolt the heat shield under the car (4 bolts) slide it down and there is one 10mm bolt holding the linkage then unbolt from interior then pull the linkage through
15. while your under, trace the tranny visually and physically and spiritually and make sure nothing is attached still, for a easy dismount
16. put you jack under the trans and raise it right up to it maybe even give it a extra slight raise
17. now undo the front mount and lower you jack
18. The Trans should slide out with a wiggle if not use a long screw driver to pry it but don’t force it. Remember its soft metal and you don’t want to “oh Shit” it.
19. Now there are 2 lines that you will no longer need and can either be capped off or just leave be. they are the trans mission fluid lines that go to and from the radiator
Once you have it out let’s get started on the interior fun:
1. Remove the center council radio, ash tray, etc
2. I removed the whole dash and steering column just to be easier on me.
3. Removing the steering column is just one 10mm bolt that is under the hood. No need to undo all the wires that are connected.
4. Remove the steering wheel cover part that cover’s the fuse box if you haven’t removed the whole dash
5. Remove the steering wheel cover top and bottom
6. Now undo all the wiring connected to the shifter assembly but don’t just cut them pull them out like you’re supposed to
7. Remove everything so the 4 10mm bolts that hold down the automatic shifter selector are easy accessible and undo them. Now some people have 1 or 2 of those 10mm bolts that have nuts on the undercarriage of the car. Me being a one man show I figured I would get my trusty cutting wheel out and cut the heads off and knock them through with a hammer
8. Now you should just have all those pretty wires and the pedal assembly that’s left
9. Remove the pedals. this is where unbolting the steering column makes it easier
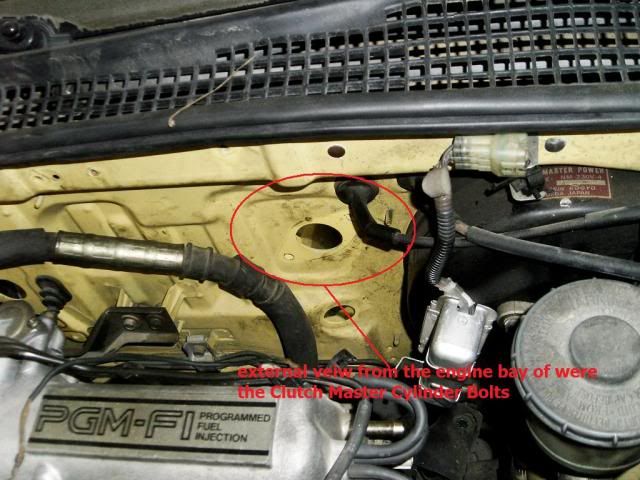
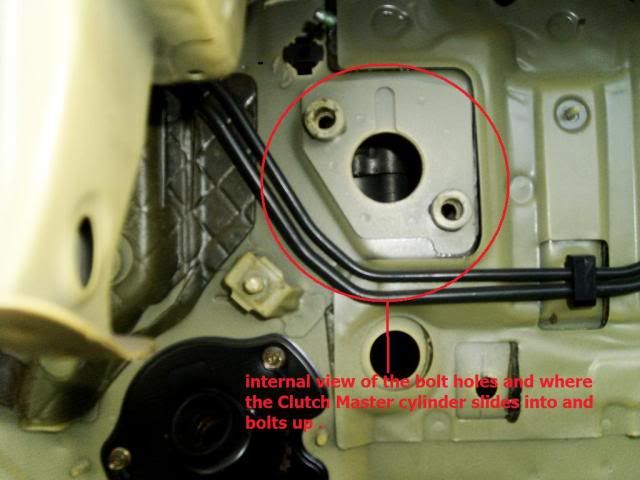
10. There is a plug were the clutch master cylinder should be knock it out.
![Image]()
![Image]()
11. There is a plug also were the shifter cables go knock that out to I just used a long pry bar with light force
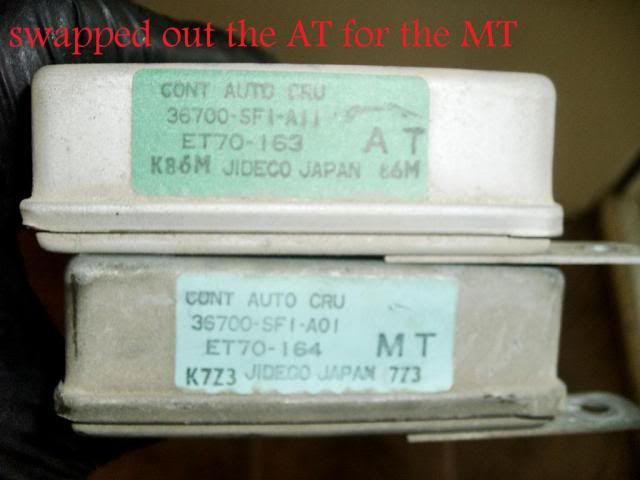
12. Since your still jerkin around under the dash there is a small box on your left with one plug called the CONT AUTO CRU don’t bother looking for the words there on top. AT unplug it and remove it (its held by 2 little screws feel for them with your girly fingers and remove) some people say it’s not necessary but I did it
![Image]()
I think you are ready for the install now:
1. First thing I did was fish the shift cables through that hole in the fire wall. This I used 2 people and tied 550 cord (strong string) to the ends I was fishing through and have one person pulling the cord and letting loose while the other under the hood pulling and pushing till they come through. Prepare yourself for some frustration.
2. Now you’re going to set up your shifter assembly don’t bolt it down just yet but attach the cables were they go with on the shifter assembly and clip them down.
![Image]()
3. Now you’re going to set up your tranny by attaching the throw-out bearing to the forks. The slave cylinder needs to be off for installation.
4. Bolt down your fly wheel 8, 12-point 17mm bolts and torque down to 76 ft-lbs
5. Install your clutch and finger tight it on then install the clutch alignment tool and torque down the 6 bolts 19 ft-lbs. (remove clutch alignment tool)
http://media.honda.co.uk/car/owner/media/manuals/PreludeManual/62sf100/7-13.pdf
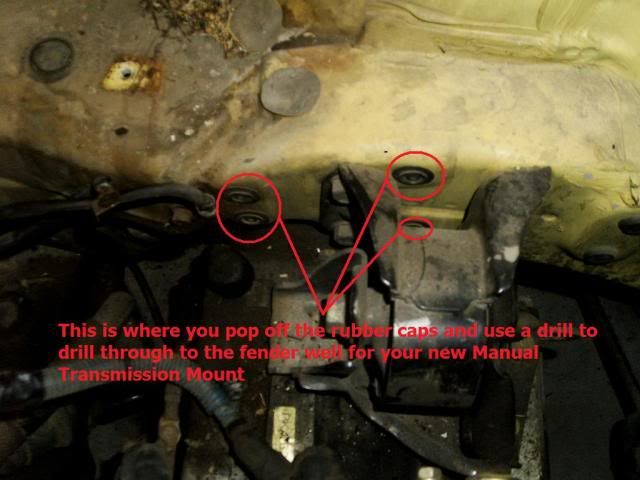
6. Making space for the manual tranny mount, this step is a hell of a lot easier with the tranny off trust me.
![Image]()
· The pictures should be enough explanation.
7. Once the holes are drilled then undo the mount and bolts.
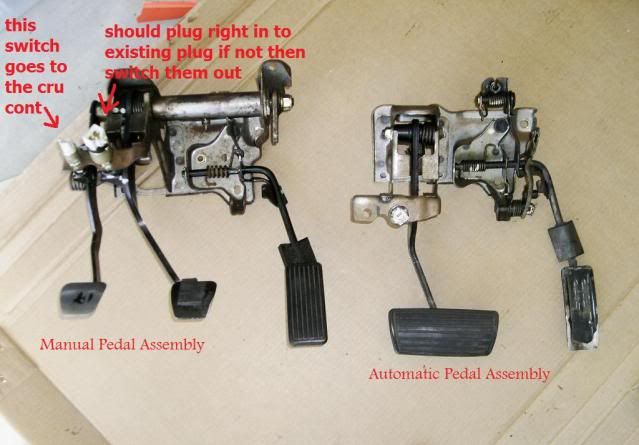
8. Bolt up your new Manual pedal assembly with clutch pedal. 12mm nuts
![Image]()
9. Get your clutch master cylinder and fish it in the correct spot and bolt down
10. run your hard wire or brake line to the clutch pressure regulator from the Clutch Master Cylinder
![Image]()
11. Then slide the trans under the car and raise it with a jack up to the engine and wiggle her on. Remember not to force anything and also make sure nothing has moved in the way to were the engine and trans meet. ** make sure the dowel pins are where they need to be, there 14mm holes I believe there is two.**
12. Finger tighten a few of the trans bolts
13. Remove the speed sensor. It pulls out with I nice tug.
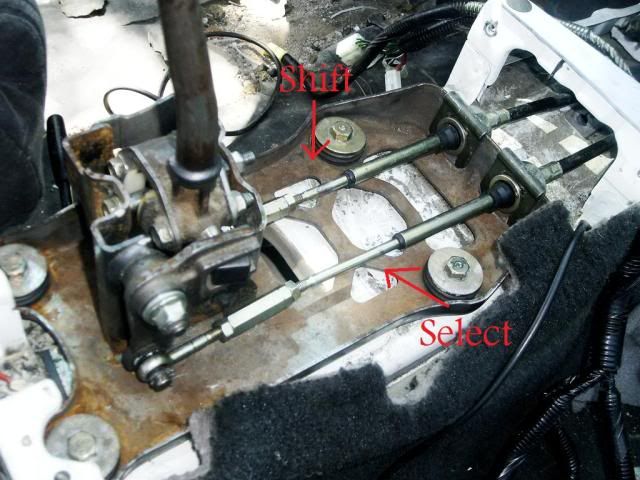
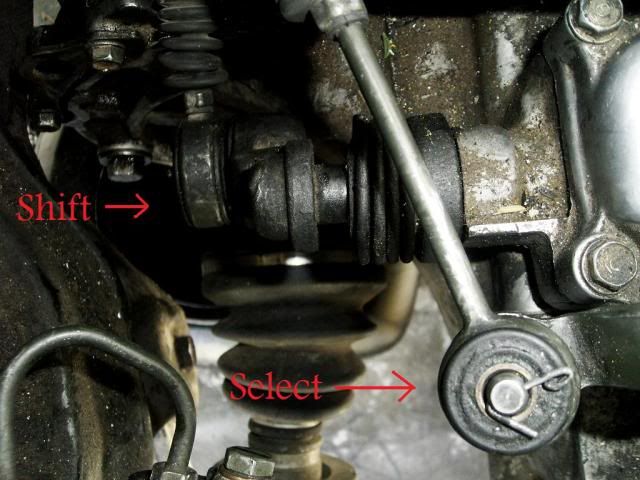
14. Then while its hanging bolt down the shift linkage and connect it. 3, 10mm nuts.
![Image]()
15. Slide the speed sensor back on in
16. Then tighten all transmission bolts down, there should be 6 total
17. Then bolt up your new Manual Transmission bracket and get her tight. Since the holes are already pre-cut then it will be level.
18. Then raise your trans up to the mount and bolt up the 3 transmission mounting bolts
19. Crawl under and bolt up the rear engine mount to the trans 4 bolts
20. Then the clutch cover plate 3, 10mm bolts
21. Then the engine stiffener 4 bolts
22. Slide the half shaft over the exhaust then into the transmission making sure it’s fully in so the holes of the half shaft mount line up.
23. Now you’re just about done. Bolt up your center beam 6 bolts
24. Now install the slave cylinder 2 bolts and run your hose from the slave cyl to the pressure reg.
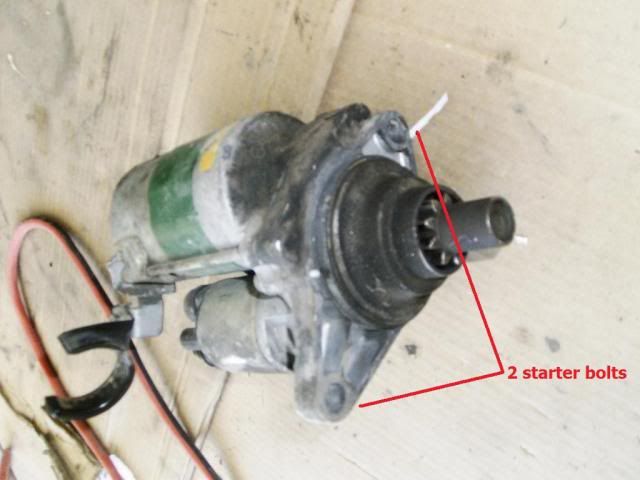
25. Install your starter 2 bolts and wire it.
![Image]()
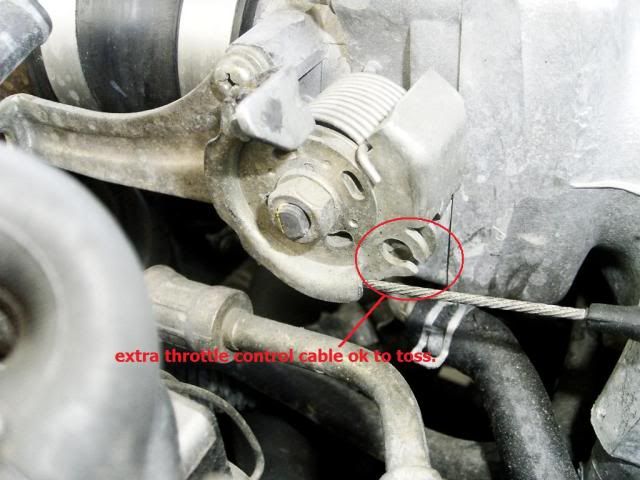
26. You’re going to have an extra Throttle control cable just detach it and toss.
![Image]()
27. Slide your axels in.
28. Re-install all your fender well suspension
29. Bolt down the NEW 32mm axel nuts and flatten the proper side.
30. Put your tires back on
31. Lower your car down and place on level ground.
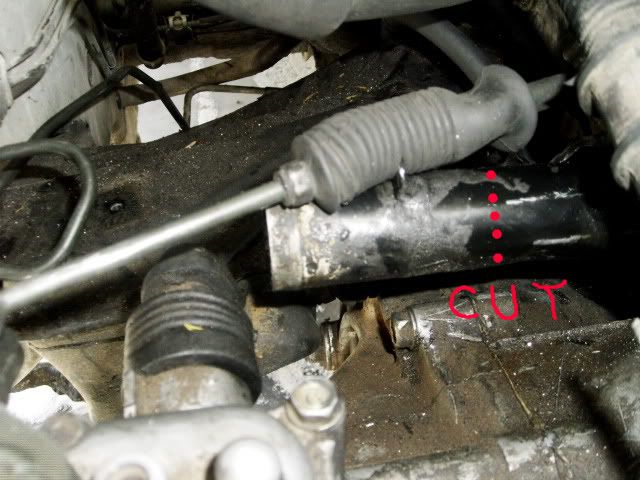
32. Pop the hood and notice how the radiator hose doesn’t fit. You can do one of two things now either cut the pipe to proper length or use the manual pipe from the donor car. I just cut it. Works good for me. Just don’t cut too much
![Image]()
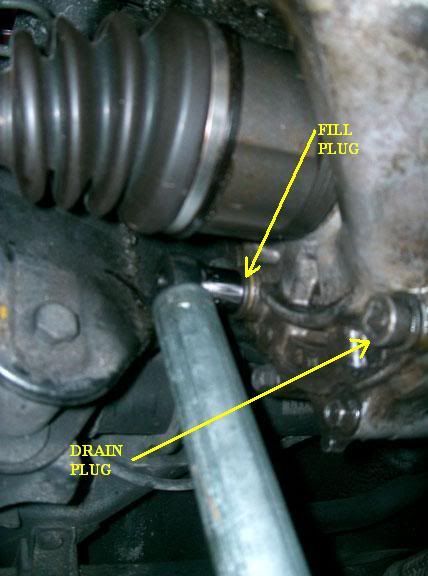
33. Remove the transmission fill bolt and fill till it pours back at you. And bolt up.
![Image]()
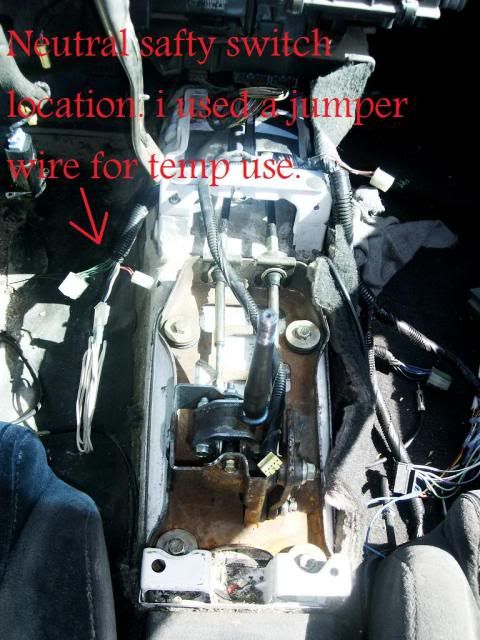
34. Bolt up your cool Manual shift lever and assembly 4 12mm bolts with rubber washer and sleeves.
![Image]()
Electrical Portion
Courtesy of Daily Interludes wiring write up:
http://www.preludepower.com/forums/showthread.php?t=201690&highlight=auto+manual
Wiring (all at the connector that used to plug into the shift position console switch):
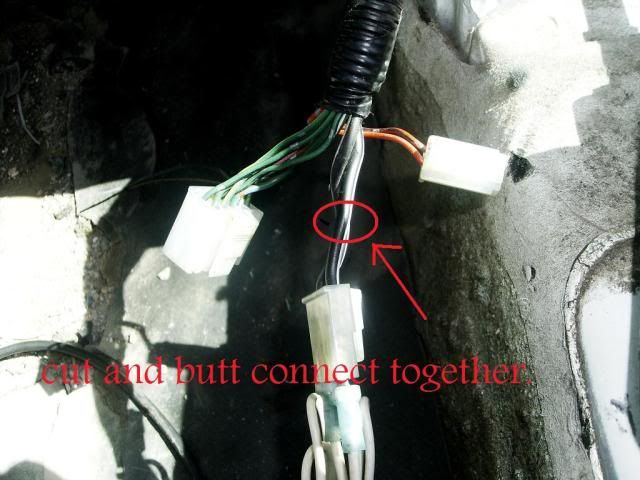
a.Starter (?): There are 2 larger black/white wires that you'll need to crimp together to start the car.
![Image]()
![Image]()
b. Cruise: There is a black and a pink wire which both need to be crimped together for cruise (you won't have clutch disable though...if you want clutch disable, connect these wires to the ones on the clutch switch attached to the pedal).
![Image]()
Beatngyou27- I just used the (cont auto cru cont) from the manual donor car and butt connected the pink wire on the clutch sensor on the pedal and the plug that goes into the (cont auto cru cont) MT. Then just grounded the ground wire on the chassis.
c. Reverse lights...There is a pair of wires on the tranny that need to be connected to the same colored wires from the Shift Position Console Switch inside .
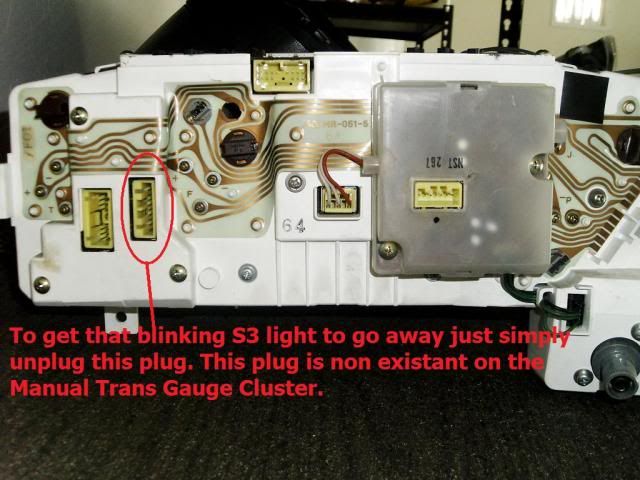
Optional: You can swap out the gauge cluster though it's not necessary
![Image]()
:wave: Much Thanks to:
· Daily Interlude - wiring guide/electrical portion
· Schuyler91 – got me off my ass to do this
· Luzer – tranny fill pic
I would highly suggest reading over this many times before starting and making sure you have it planned out in your head before starting.
· The online manual I used for a reference for some of this info is:
http://media.honda.co.uk/car/owner/media/manuals/PreludeManual/index.html
These steps are for my 88Lude 2ws (B20A5)
Parts Needed
· Pedal Assembly w/clutch pedal
· Manual Transmission
· Manual Transmission Starter
· Flywheel W/8 Bolts
· Throw-out Bearing
· Clutch alignment tool (TAT-5319)
· Transmission Mount For Manual
· Clutch Pressure Regulator
· Clutch W/ 6 Bolts
· Clutch Cover
· Clutch Master Cylinder
· Clutch Slave Cylinder
· Shifter Assembly
· Shift Linkage W/ Trans Bracket
· ( Cont Auto Cru) MT
· Brake sensor on pedal W/plug
· Clutch sensor On Pedal W/plug
· Box of Sandwich Bags for All Bolts and Small Parts
& 2 ft of heater hose the orig hose is to short
Oh and you will need three M10 X 1.50P X 90mm bolts for the trans mount. and one about half in shorter.
Ok I think were ready to get started now:
1. Jack up the car and secure it on jack stands. Very important remember safety 1st. I knew a guy who died cuz the car fell on him.
2. Remove all the Trans Fluid and Radiator Fluid
3. Remove Battery & for comfort I also removed the tray 10mm
4. Remove Intake and any other things that will be in your way
5. I removed both axles 32mm Nut and both sides of your fender well suspension
6. Now I removed the axel haft shaft
7. I went back up top and removed all the wiring and fluid linkage attached to the Auto Transmission
8. Remove the Starter and starter wiring
9. Remove center beam 6 bolts
10. Remove all Transmission Bolts
11. Crawl back under and remove the rear engine mount bolts
12. Then remove the Flywheel cover
13. Unbolt the 10mm bolts behind the torque converter. The transmission will come off if you skip this step but I’m sure it will be allot easier if you do unbolt them first.
14. now I kind of cheated by just cutting the automatic shift linkage with my wheel grinder on the interior and under but, the way you should do it is unbolt the heat shield under the car (4 bolts) slide it down and there is one 10mm bolt holding the linkage then unbolt from interior then pull the linkage through
15. while your under, trace the tranny visually and physically and spiritually and make sure nothing is attached still, for a easy dismount
16. put you jack under the trans and raise it right up to it maybe even give it a extra slight raise
17. now undo the front mount and lower you jack
18. The Trans should slide out with a wiggle if not use a long screw driver to pry it but don’t force it. Remember its soft metal and you don’t want to “oh Shit” it.
19. Now there are 2 lines that you will no longer need and can either be capped off or just leave be. they are the trans mission fluid lines that go to and from the radiator
Once you have it out let’s get started on the interior fun:
1. Remove the center council radio, ash tray, etc
2. I removed the whole dash and steering column just to be easier on me.
3. Removing the steering column is just one 10mm bolt that is under the hood. No need to undo all the wires that are connected.
4. Remove the steering wheel cover part that cover’s the fuse box if you haven’t removed the whole dash
5. Remove the steering wheel cover top and bottom
6. Now undo all the wiring connected to the shifter assembly but don’t just cut them pull them out like you’re supposed to
7. Remove everything so the 4 10mm bolts that hold down the automatic shifter selector are easy accessible and undo them. Now some people have 1 or 2 of those 10mm bolts that have nuts on the undercarriage of the car. Me being a one man show I figured I would get my trusty cutting wheel out and cut the heads off and knock them through with a hammer
8. Now you should just have all those pretty wires and the pedal assembly that’s left
9. Remove the pedals. this is where unbolting the steering column makes it easier
10. There is a plug were the clutch master cylinder should be knock it out.
11. There is a plug also were the shifter cables go knock that out to I just used a long pry bar with light force
12. Since your still jerkin around under the dash there is a small box on your left with one plug called the CONT AUTO CRU don’t bother looking for the words there on top. AT unplug it and remove it (its held by 2 little screws feel for them with your girly fingers and remove) some people say it’s not necessary but I did it
I think you are ready for the install now:
1. First thing I did was fish the shift cables through that hole in the fire wall. This I used 2 people and tied 550 cord (strong string) to the ends I was fishing through and have one person pulling the cord and letting loose while the other under the hood pulling and pushing till they come through. Prepare yourself for some frustration.
2. Now you’re going to set up your shifter assembly don’t bolt it down just yet but attach the cables were they go with on the shifter assembly and clip them down.
3. Now you’re going to set up your tranny by attaching the throw-out bearing to the forks. The slave cylinder needs to be off for installation.
4. Bolt down your fly wheel 8, 12-point 17mm bolts and torque down to 76 ft-lbs
5. Install your clutch and finger tight it on then install the clutch alignment tool and torque down the 6 bolts 19 ft-lbs. (remove clutch alignment tool)
http://media.honda.co.uk/car/owner/media/manuals/PreludeManual/62sf100/7-13.pdf
6. Making space for the manual tranny mount, this step is a hell of a lot easier with the tranny off trust me.
· The pictures should be enough explanation.
7. Once the holes are drilled then undo the mount and bolts.
8. Bolt up your new Manual pedal assembly with clutch pedal. 12mm nuts
9. Get your clutch master cylinder and fish it in the correct spot and bolt down
10. run your hard wire or brake line to the clutch pressure regulator from the Clutch Master Cylinder

11. Then slide the trans under the car and raise it with a jack up to the engine and wiggle her on. Remember not to force anything and also make sure nothing has moved in the way to were the engine and trans meet. ** make sure the dowel pins are where they need to be, there 14mm holes I believe there is two.**
12. Finger tighten a few of the trans bolts
13. Remove the speed sensor. It pulls out with I nice tug.
14. Then while its hanging bolt down the shift linkage and connect it. 3, 10mm nuts.
15. Slide the speed sensor back on in
16. Then tighten all transmission bolts down, there should be 6 total
17. Then bolt up your new Manual Transmission bracket and get her tight. Since the holes are already pre-cut then it will be level.
18. Then raise your trans up to the mount and bolt up the 3 transmission mounting bolts
19. Crawl under and bolt up the rear engine mount to the trans 4 bolts
20. Then the clutch cover plate 3, 10mm bolts
21. Then the engine stiffener 4 bolts
22. Slide the half shaft over the exhaust then into the transmission making sure it’s fully in so the holes of the half shaft mount line up.
23. Now you’re just about done. Bolt up your center beam 6 bolts
24. Now install the slave cylinder 2 bolts and run your hose from the slave cyl to the pressure reg.
25. Install your starter 2 bolts and wire it.
26. You’re going to have an extra Throttle control cable just detach it and toss.
27. Slide your axels in.
28. Re-install all your fender well suspension
29. Bolt down the NEW 32mm axel nuts and flatten the proper side.
30. Put your tires back on
31. Lower your car down and place on level ground.
32. Pop the hood and notice how the radiator hose doesn’t fit. You can do one of two things now either cut the pipe to proper length or use the manual pipe from the donor car. I just cut it. Works good for me. Just don’t cut too much
33. Remove the transmission fill bolt and fill till it pours back at you. And bolt up.
34. Bolt up your cool Manual shift lever and assembly 4 12mm bolts with rubber washer and sleeves.
Electrical Portion
Courtesy of Daily Interludes wiring write up:
http://www.preludepower.com/forums/showthread.php?t=201690&highlight=auto+manual
Wiring (all at the connector that used to plug into the shift position console switch):
a.Starter (?): There are 2 larger black/white wires that you'll need to crimp together to start the car.
b. Cruise: There is a black and a pink wire which both need to be crimped together for cruise (you won't have clutch disable though...if you want clutch disable, connect these wires to the ones on the clutch switch attached to the pedal).

Beatngyou27- I just used the (cont auto cru cont) from the manual donor car and butt connected the pink wire on the clutch sensor on the pedal and the plug that goes into the (cont auto cru cont) MT. Then just grounded the ground wire on the chassis.
c. Reverse lights...There is a pair of wires on the tranny that need to be connected to the same colored wires from the Shift Position Console Switch inside .
Optional: You can swap out the gauge cluster though it's not necessary
:wave: Much Thanks to:
· Daily Interlude - wiring guide/electrical portion
· Schuyler91 – got me off my ass to do this
· Luzer – tranny fill pic


